6 Fixes for “VAC Was Unable to Verify Your Game Session” with Images
One of the most annoying errors a player can receive when attempting to join a competitive Counter-Strike 2 match or any other official CS2 server is the one that says “VAC Was Unable to Verify Your Game Session”. This error message can appear at any time without warning and can be caused by one of many different issues
The main problems could include:
- Corrupted game files
- Issue with Steam
- Unable to reach VAC servers on Steam
- Wrong application privileges
- Developer issue
Do not worry though, there are 6 fixes here to solve the problem with VAC unable connect with your game, after each fix you should try and start a match in the game to see if your problem has been solved. At the end if none of these fixes worked, restart your computer to try one last time. We’ve added the contact e-mail for the developers for further support as your issue may be unique.
Fix 1. Steam Issue with CS2
Before you start looking into other fixes it is a good idea to check if this issue is because of Steam and not your computer. You can check the official CS2 forum on Steam and see if others are having the same issue as you, if lots of people are recently it may mean that the issue has to do with Steam.

In this case, it is best to wait for the CS2 developers to fix the issue on their end. There is no issue though if you want to try the fixes below as they can be important ways to also fix other issues your game may be having.
Fix 2. Run Steam and CS2 as an Administrator
The quickest fix that could solve the issue with VAC unable to verify your games session is running both Steam and Counter-Strike 2 as an administrator.
First close CS2 and Steam. Steam needs to be completely closed so ensure that Steam is closed in the taskbar, not just minimized. You can do this by right-clicking the icon and selecting “Exit”.
Locate Steam by searching Steam in Windows or going to the folder that Steam is located in. The default location can be found below. Right-click Steam.exe and select run as administrator.
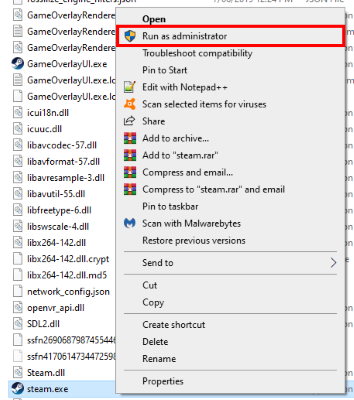
Once Steam is open and you are logged in do the exact same thing for Counter-Strike 2.
Default Steam Location: C:\Program Files (x86)\Steam
Default CS2 Location: C:\Program Files (x86)\Steam\steamapps\common\Counter-Strike 2\
Now attempt to join an official CS2 server and see if you are able to join. If not move on to the next fix.
Fix 3. Verify Game Files
A file in your CS2 folder may be corrupt and need replacing. This can happen at any point and can be for a reason unknown to you. Luckily, Steam has made a simple way to check to see if your game files are fine.
Open steam and go to your games library. Right-click on Counter-Strike 2 and click on “properties…”. This opens the properties menu which allows you to change to beta versions of the game, input launch settings and various other options. We will be using it to verify the game’s files, Click “Local Files” in the top menu and select “Verify Integrity of Game Files…” in that menu.

Steam will then check each of the files and download any that are not correct. After the download is complete try to start a match on an official steam server to see if your problem is fixed. If not move onto fix number 4.
4. Repair Steam
It might not be the game with the issue at this point and you will want to repair the Steam service on your computer. This is easily done by running a command in your Run application.
First close steam as we have done previously by right-clicking on the image in the taskbar and selecting “Exit”. Open the Run application on your windows machine by searching “Run” in Windows Start Menu.
Copy and paste the command below or type it in and press enter.
C:\Program Files (x86)\Steam\bin\SteamService.exe" /repair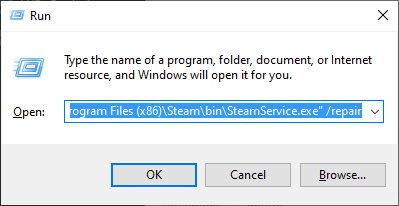
A black terminal box will appear and be blank. Let it run until it closes by itself, once it has closed the repair has been completed and you are able to open up Steam and CS2 again. Check if you are able to join an official CS2 server, if the issues persist move on to reinstalling CS2.
5. Reinstall CS2
Now it is time to uninstall the game and start from scratch, this will fix any rogue settings your game may have, stopping the communication to VAC. Verifying the game’s files won’t fix this because these settings can be altered by you or an external program, still meaning the file is working as intended according to Steam.
Uninstalling CS2 is very easy, locate the Counter-Strike 2 game in your Steam library. Right-click the name to give you a list of additional options, select manage and then select uninstall. A confirmation will pop up to confirm that you want to uninstall the game.

Now right click and install the game. Wait for it to download, it may take a while to download as it needs to download the entire game again and install it onto your computer. If you haven’t already now is the time to check if the CS2 skins you have are the ones you want to play with, look at our CS2 Trading Websites to find the right website where you can get the skins you really want..
6. Contact the Developers
The very last option is to contact the developers of the game at Valve. They have provided an e-mail with and what to type in the subject to make sure it is handled correctly.
Email: CS2TeamFeedback@valvesoftware.com
Subject: VAC Unable to Verify Game Session
Provide them with any information that you think may have cause this such as your computer specifications, your Steam account, as well as what you have done here.
Final Remarks
If you are having other issues with CS2 you are able to try all of these to fix that issue as well, these are fixes are commonly used to fix various issue and are extremely user-friendly to ensure you are unable to damage your computer system. These fixes for the VAC Was Unable to Verify Your Game Session issue have been placed in a very specific order to ensure you spend the least amount of time trying to fix the problem to let you get back into the game and play as soon as you can.